Showing posts with label os x. Show all posts

Django Configuration - Serve Static Media w/Templates

I must say that Django documentation is all-around really fantastic. In fact, I've never run into a situation where I was totally stumped and their docs haven't saved the day. Regardless, there are always niches where you'll wish there was a slightly better real-world example - in this case regarding serving static media (stylesheets, javascript, image files, etc) on the development server. Their doc on this subject, found here, covers the base configuration pretty well however I still found that I couldn't get Django to recognize my static media for some reason. After messing with the config for a bit I managed to get it operational so If you're having the same problem, follow these steps and you'll have it running in no time.

The tutorial assumes basic knowledge of Django and that your project is located at the path (on OS X): '/Users/[USER_NAME]>/Code/Django/[PROJECT_NAME]' where USER_NAME is your OS X account and PROJECT_NAME is the top level directory of your project, likely where you ran the 'django-admin.py startproject [PROJECT_NAME]' command. For example, the path to my project is '/Users/john/Code/Django/testproj'. Obviously your code doesn't have to be on this exact path but you'll need to make sure you adjust the paths in the code below accordingly.

Note : In section two below I give two different ways to configure your settings.py file; The first way is with the paths hardcoded into the variables and the second is using python's built-in os module to create absolute paths to your static files. I kept both in here as a demonstration of how it works but I highly recommend going the absolute path route since your code will be portable across systems. Also, it should work on Windows without mods as well.

Configure URLconf - Make Static Media View Available for DEBUG Only


First, open the top-level urls.py file and add the following settings.DEBUG code after the urlpatterns that already reside there. The following is a basic example of my urls.py file:

from django.conf.urls.defaults import *
from testproj.base.views import index
from django.conf import settings

urlpatterns = patterns('',
     (r'^$', index),
)
if settings.DEBUG:
     urlpatterns += patterns('',(r'^static/(?P.*)$', 'django.views.static.serve',{'document_root': settings.MEDIA_ROOT}),
)


As explained in Django's documentation, it is recommended that in a production environment the server should provide the static files, not your Django code. Using the settings.DEBUG test will ensure that when you move it to production you'll catch the static files being served by Django since the DEBUG setting will be False in prod.

In the code you're importing the settings module from django.conf. The settings.DEBUG config is ensuring that any requests matching 'static/PATH' are served by the django.views.static.serve view with a context containing 'document_root' set to whatever path is found in settings.MEDIA_ROOT. Next we're going to set the value of that path in the settings.py file.

Configure Django Settings to the Location of Your Media


The first step is to create a directory named 'static' in the Django project folder and two directories within it named 'css' and 'scripts'. In the future you'll place your static files in folders within the main 'static' directory - the way you organize them doesn't make a difference just make sure it's a logical setup and that you adjust your template tags to point to the right folder (refer to the next section).

Option #1: Hardcoded Path


Open your settings.py file and modify the MEDIA_ROOT, MEDIA_UR, and ADMIN_MEDIA_PREFIX settings as follows (remembering to change the path to the location of your own static folder):
MEDIA_ROOT = '/Users/john/Code/Django/testproj/static/'

MEDIA_URL = '/static/'

ADMIN_MEDIA_PREFIX = '/media/'


Now, double-check that you didn't forget to add the beginning and ending '/' on each of the paths you modified as this will confuse Django. Note that while the ADMIN_MEDIA_PREFIX and MEDIA_URL don't necessarily have to be different, it is recommended by Django. If somehow you've wandered in here looking for instructions on how to do this on Windows I believe that the only difference in the entire tutorial is to change MEDIA_ROOT setting to 'C:/path/to/your/static/folder'. Following the rest of this should work on Windows but I didn't have time to validate that.

Option #2: Absolute Path option - Recommended


Instead of hardcoding as mentioned above, I'd recommend going the absolute path route since you can port your code from system to system without rewriting the settings.py file. Remember, either option should work but only use one way or the other.

Instead of hardcoding the paths into settings.py you'll import the os module and use the os.path.abspath('') method to acquire the working directory for your code dynamically and set it to ROOT_PATH. Then you'll adjust the same settings as before using the os.path.join method to attach your static directory. Refer to the code in settings.py below:

import os

ROOT_PATH = os.path.abspath('')
....
....
MEDIA_ROOT = os.path.join(ROOT_PATH,'static')
MEDIA_URL = os.path.join(ROOT_PATH,'static')
ADMIN_MEDIA_PREFIX = os.path.join(ROOT_PATH,'media')


Notice that when you use os.path.join(ROOT_PATH,'static') you won't put the '/' before and after the static directory as we did in the previous option.

Modify your Template to Point at the Static Directory


The final step is to make sure that in you've modified the HTML tags (script, link, etc) in your template to point at your 'static' directory. For example, here's how my script and link tags are configured for the example project:


The script src link is set to "/static/scripts/scripts.js" since this is where I've placed my javascript files. Again, don't forget to put the initial '/' at the beginning of your path.

Wrap it Up and Call it a Day


Test it out by running the 'python manage.py runserver' command from your project directory and everything should be working beautifully. If you run into problems it's likely that you've either forgotten or added a '/' in the wrong place on the paths you've configured.

Configure Eclipse with Python and Django on OS X

I've recently been doing some development using the Python web application framework Django. To make my life easier, I configured Eclipse to work with Python and Django however I soon discovered the many disparate resources on the web are either dated or incomplete. Thus, the main goal of this post is to consolidate those resources into one comprehensive and easy to follow post that I'll try to keep as succinct as possible while maintaining clear instruction. Also, I'll assume that you already have Eclipse installed and if not, go get it - what are you waiting for? I'm using Eclipse 3.5.1 but I believe these instructions will work for 3.4.x as well with some slight modifications.

Also, these instructions assume the following:

  • For simplicity's sake we're going to use SQLite for Django database - Python 2.5 and above come with SQLite support so no install necessary.

  • No previous versions of Pydev modules or Django on your system.

  • We'll be using the built-in versions of Python inherent in Leopard (python version - 2.5.1) or Snow Leopard(python version - 2.6)


Installing Python Support - Pydev plugin


The Pydev plugin from aptana gives you syntax highlighting, code complete, etc for Python in the Eclipse environment and in my experience work exceptionally well.

Open Eclipse and perform the following:

1) Help->Install New Software. In the "Work With" form section, input the following site to download the Pydev modules: http://pydev.org/updates.

2) Select the Pydev plugin modules in the checkbox.


3) Click through, accepting the licensing agreements and wait for the module to install. Restart Eclipse. Open Eclipse->About and click on the Pydev Icon - we want to get the latest version of Pydev which is version 1.5.0.125.1989166 at the time of this post. If you have an earlier version use the automatic update feature of Eclipse to update just the Pydev module (Help->Update Software)

Install Django


4) Download Django 1.1.1, open a Terminal, navigate to the directory where you downloaded Django, and run the following commands:


tar -xvf Django-1.1.1.tar.gz
cd Django-1.1.1
sudo python setup.py install


Yep, it's as easy as that.

Configure PyDev to use Django


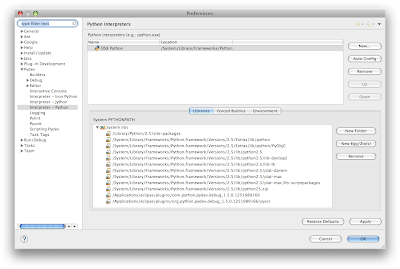
4) After installing Django, we need to ensure that the newly installed directories are visible to the Eclipse python interpreter. In the toolbar under Eclipse->Preferences->Pydev, click the Interpreter-Python option and the following window will appear:


5) Click 'New' and populate Interpreter Name with any value you want (I called it 'OS X Python'), and populate the Interpreter Executable with the path to your python executable - the default path on OS X is /usr/bin/python.


6) Eclipse will attempt to locate the libraries for Python and will display a pre-populated list of directories to add to the Eclipse PythonPath - i.e., the modules and binaries necessary for Python to run. Critical here is to select the directory where Django files were extracted when we installed it earlier. So make sure to select '/Library/Python/2.x/site-packages', as in the screenshot below. After you click 'OK' you'll be taken back to the preferences screen. Click 'OK' again and Eclipse will reparse the site packages.


Sanity Check


7) As a quick sanity check, create a new PyDev project and then a new Python file within that project space. Test a django import statement to see if code completion is working. It should look something like the screenshot below:


Create a New Django Project


8) Open Terminal navigate to a directory where you want to store your first Django project. Once there create a new directory for your project, navigate into the folder and enter the following command:

django-admin.py startproject PROJECTNAME
It's important to create the top level directory and place the new project files into a separate directory, as we'll see in a few minutes. If you navigate into the directory you created you'll see that Django has created the prepopulated files __init__.py, manage.py, settings.py, and urls.py within that directory. Now we have to import these into Eclipse.

9) In Eclipse, click 'File->New->Pydev Project' Name the project then uncheck 'Use Default' since we're using code that's already created for us in the previous step. Instead, click 'Browse' and navigate to the location of the top level directory you created previously. Uncheck 'Create default src folder' and click 'Finish'.


In my case, I created a top level directory named Djangoprojects and created the Django files with the django-admin.py command inside a directory named Django.

10) Within Eclipse, right-click the project you've created and click 'Properties->Pydev-PYTHONPATH->Add Source Folder' and select the project folder you created.


Now in the package explorer for your newly created project you'll see that your __init__.py, manage.py, settings.py, and urls.py are showing as a package.

Set up the Django Testserver


11) Now we have to configure Eclipse to start the the Django test server when we run our program. Right-click your new project in the Package explorer-> Properties->Debug Configurations(or Run/Debug Settings in newer versions of Eclipse). Click 'New' and select 'Python Run'. Press the new configuration button at the top, then give the new configuration a name (I call mine DjangoTest), under Project click 'Browse' and point to our new project, and under Main Module point to the manage.py of our new project. It should look as follows:


Under the Arguments tab, for Program Arguments, type in 'runserver'. Refer to the screen below:


Now right-click your project, then 'Debug As->Python Run' then browse to the manage.py file within your project to launch, and click 'Ok', if all went well you'll get info in the console indicating that the pydev debugger is running:


Point your browser to http://localhost:8000/ and you should see the following page:


Unfortunately, you'll likely find that you're unable to shut down the server from Eclipse using the square red button near the console. Also, it won't shut down when you close Eclipse so you'll have to get in the habit of shutting down the Python process using Activity Monitor.

Debugging with Django and Python


12) Nearing the end of the process now. We have to point Eclipse to the working directory within our workspace for it to be able to access the database (SQLite in our case). So we go back to the Python perspective and right click our project->Debug As-> Debug Configurations(or Run/Debug Settings in newer versions of Eclipse)-> Arguments Tab. Under 'Working Directory' we click 'Other' then 'Workspace' and browse to our inner folder (In my case the Django folder within Djangotest). Bear in mind that if your code resides in a directory outside the Eclipse workspace you'd have to use the 'File System' button and point to the appropriate directory in your filesystem. Refer below:


The final debug configuration should appear as the one below:


13) Lastly we need to configure Eclipse to have the python debug folder 'pysrc' in the PYTHONPATH variable. Select Eclipse in the menu toolbar -> Preferences ->Pydev->Interpreter-Python->New Folder. Browse to the plugins folder of your Eclipse install, in my case located on the path '/Applications/eclipse/plugins/org.python.pydev.debug_1.5.0.1251989166/pysrc. Click apply and Eclipse will again reconfigure the PYTHONPATH to include the debug extensions. Be careful here if you updated your pydev modules as described there will be a debug folder for the previous version and you want to make sure you're using the latest and greatest. The config should look like the screenshot below:


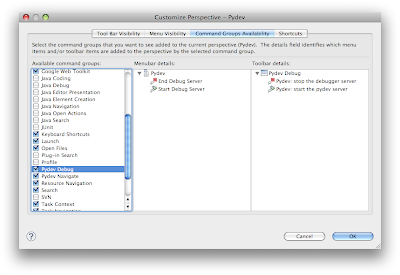
In order to simplify starting and stopping the debug server, right-click the toolbar Eclipse toolbar (within the Eclipse window) where there aren't buttons and select 'Customize Perspective'. Click the 'Command Groups Availability' and check the Pydev Debug switch. This will place the start and stop debug server options directly within the Eclipse toolbar. It should like like this:


Now, when adding breakpoints to your code you'll be able to debug in Eclipse as you're used to with Java. One note: in order to see the debugging perspective within Pydev you'll have to close the Pydev perspective and reopen it so it can reload the modules we've added - otherwise you'll never see the debug option. In order to test this place a breakpoint in your python code and run the debugger. The python debug perspective will subsequently open and you'll be able to step through your code, see running values of variables, etc.

14) Celebrate. You've completed installation of Python and Django support in Eclipse and this was no easy task. I'd suggest periodically looking for updates to the Pydev extensions as they are regularly improved by the good folks at aptana. The following is a list of several resources I used to compile this post in the event that you need additional help:

top