Create a Custom Listfield - Change Highlight Color when Scrolling

When you're programming for Blackberry you will likely find yourself in need of displaying a list of items that are selectable to the end user. The ListField class in the Blackberry API is extremely versatile and should be your first choice when considering how to display a list of options.

Key to coding the ListField is to register a ListFieldCallback - a class that implements the ListFieldCallback interface and can be thought of as a data structure that holds the contents of the List and permits you to modify, update, delete, and read these contents. In other words, the ListField handles the painting of the list and the Callback handles the storage of the list contents.

For this article I'll show you how to get a ListField up and running on the Blackberry and how to customize the highlighting of each row when the user scrolls across the list. For demonstration purposes we'll create the ListField as a private class within the main class that extends UiApplication and simply add our field managers that will hold the ListField to the MainScreen. Note that the code samples do not include the required code for capturing the user selection and performing an action on it - I may write another tutorial around that if people request it however that's pretty straightforward. In the end, our main goal is to have a list that looks like the one below, where the user selection is highlighted in a different color as they scroll across the list:


Write the Constructor


Please note that all the code below is continuous and should be contained in one file. I'll put a link to download the entire code in one file if the demand is there. However, I think it's a good learning experience to see each piece, understand how it works and put it together at the end into a cohesive working program. First, we'll import the necessary classes and create the main function for our example. I'm going to do all the heavy lifting in the constructor of the class - please note that the VerticalFieldManager and the HorizontalFieldManager in the next sections are also part of the constructor. Also, we're declaring instances of the ListField and ListFieldCallback early in the constructor and will flesh out those classes a bit later. Here's the first part of the code:


import net.rim.device.api.system.Bitmap;
import net.rim.device.api.system.Display;
import net.rim.device.api.ui.*;
import net.rim.device.api.ui.component.*;
import net.rim.device.api.ui.container.*;

import java.util.Vector;

public class ListFieldTest extends UiApplication {

public static void main(String[] args){

//main entry point
ListFieldTest theApp = new ListFieldTest();
theApp.enterEventDispatcher();

}


public ListFieldTest(){

HorizontalFieldManager _hfm;

//The _vfm will hold the ListField and we'll add it to the _hfm
VerticalFieldManager _vfm;

//Create the vars for ListField creation
ListField myList;
ListCallback myCallback;

//Get the device width and height
final int width = Display.getWidth();
final int height = Display.getHeight();

//Create the mainScreen - this holds the _hfm and _vfm managers
MainScreen mainScreen;
mainScreen = new MainScreen();

//Private class that we will create in a minute
myCallback = new ListCallback();
myCallback.erase();

myList = new MyListField();
myList.setCallback(myCallback);

//Populate the list with sample elements
for(int i=0;i<20;i++){
myList.insert(i);
myCallback.insert("Element #" + Integer.toString(i), i);

}


Create the HorizontalFieldManager


Now we need to create the HorizontalFieldManager that will hold the ListField and VerticalFieldManager. The HFM will act as the "parent" container and will hold the VFM child and we will also use it to draw the gradient. Refer to the code below for the HorizontalFieldManager:


//Draw background gradient on this manager and add VerticalFieldManager for scrolling.
_hfm = new HorizontalFieldManager() {

public void paint(Graphics g)
{


//Variables for drawing the gradient
int[] X_PTS_MAIN = { 0, width, width, 0};
int[] Y_PTS_MAIN = { 0, 0, height, height };
int[] drawColors_MAIN = { Color.BLACK, Color.BLACK, Color.DARKBLUE, Color.DARKBLUE};


try {
//Draw the gradients
g.drawShadedFilledPath(X_PTS_MAIN, Y_PTS_MAIN, null, drawColors_MAIN, null);

} catch (IllegalArgumentException iae) {
System.out.println("Bad arguments.");
}


//Call super to paint the graphics on the inherited window
super.paint(g);


}

//Sublayout is passed the width and height of the parent window and will tell the window manager
//how to layout the buttons, images, etc.
protected void sublayout(int w, int h) {

//GetFieldCount returns the number of fields attached to the instance of this manager.
//and lays out the position
if (getFieldCount() >0) {

Field searchRes = getField(0);
layoutChild(searchRes, width, height);
setPositionChild(searchRes,0,0);

}


setExtent(width,height);

}


};


Create the VerticalFieldManager


In the VerticalFieldManager declaration we will pass in the VERTICAL_SCROLL option so the lists scroll properly within the container once we add the ListField. Additionally, make sure to override the navigationMovement() function calling this.invalidate() otherwise when you scroll the ListField won't redraw as the user scrolls over the options. Try it without the invalidate() call to see what happens. Here's the final code for the VFM in the constructor:


_vfm = new VerticalFieldManager(Manager.VERTICAL_SCROLL|Manager.USE_ALL_HEIGHT|Manager.USE_ALL_WIDTH) {

public void paint(Graphics g)
{
g.setColor(Color.GRAY);
super.paint(g);

}

protected boolean navigationMovement(int dx, int dy, int status, int time){
this.invalidate();
return super.navigationMovement(dx,dy,status,time);
}


};
//Add the list to the verticalFieldManager
_vfm.add(myList);

//Add the verticalFieldManager to the HorizontalFieldManager
_hfm.add(_vfm);
//Finally, add the HorizontalFieldManager to the MainScreen and push it to the stack
mainScreen.add(_hfm);
pushScreen(mainScreen);


}//End Ctor


Create the ListField Class


Now we'll create a private ListField class and we'll override the paint() method to draw the highlight color on the selected row. The tricky part is forcing the redraw of the highlight color - you must first determine the selected row by calling getSelectedIndex() then mathematically calculate the size of the row to paint the highlight color. Here's the code (the comments are pretty detailed explaining what is going on there):


private class MyListField extends ListField{


//0,ListField.MULTI_SELECT
private boolean hasFocus = false;

public void onFocus(int direction){
hasFocus = true;
}

public void onUnfocus()
{
hasFocus = false;
super.onUnfocus();
invalidate();
}

public void paint(Graphics graphics)
{ int width = Display.getWidth();
//Get the current clipping region
XYRect redrawRect = graphics.getClippingRect();
if(redrawRect.y < 0)
{
throw new IllegalStateException("Error with clipping rect.");
}

//Determine the start location of the clipping region and end.
int rowHeight = getRowHeight();

int curSelected;

//If the ListeField has focus determine the selected row.
if (hasFocus)
{
curSelected = getSelectedIndex();

}
else
{
curSelected = -1;
}

int startLine = redrawRect.y / rowHeight;
int endLine = (redrawRect.y + redrawRect.height - 1) / rowHeight;
endLine = Math.min(endLine, getSize() - 1);
int y = startLine * rowHeight;

//Setup the data used for drawing.
int[] yInds = new int[]{y, y, y + rowHeight, y + rowHeight};
int[] xInds = new int[]{0, width, width, 0};

//Set the callback - assuming String values.
ListFieldCallback callBack = this.getCallback();

//Draw each row
for(; startLine <= endLine; ++startLine)
{
//If the line we're drawing is the currentlySelected line then draw the fill path in LIGHTYELLOW and the
//font text in Black.
if(startLine == curSelected){

graphics.setColor(Color.LIGHTYELLOW);
graphics.drawFilledPath(xInds, yInds, null, null);
graphics.setColor(Color.BLACK);
graphics.drawText((String)callBack.get(this, startLine), 0, yInds[0]);

}
else{
//Draw the odd or selected rows.
graphics.setColor(Color.LIGHTGREY);
graphics.drawText((String)callBack.get(this, startLine), 0, yInds[0]);
}

//Assign new values to the y axis moving one row down.
y += rowHeight;
yInds[0] = y;
yInds[1] = yInds[0];
yInds[2] = y + rowHeight;
yInds[3] = yInds[2];
}

//super.paint(graphics);
}
}


Create the ListfieldCallback Class


The final step is to create the private ListFieldCallback class that's attached to our ListField. Since we're not embedding images or doing other fancy things, only writing Strings to the Callback, the code is relatively straightforward, as shown below:


//Private class to populate the ListField private variable
private class ListCallback implements ListFieldCallback{


private Vector listElements = new Vector();

public void drawListRow(ListField list, Graphics g,
int index, int y, int w) {

String text = (String)listElements.elementAt(index);
g.setColor(Color.LIGHTGREY);
g.drawText(text, 0, y, 0, w);
}

public Object get(ListField list, int index) {
return listElements.elementAt(index);
}

public int indexOfList(ListField list, String p, int s) {
//return listElements.getSelectedIndex();
return listElements.indexOf(p, s);
}


public void insert(String toInsert, int index) {
listElements.insertElementAt(toInsert, index);
}

public void add(String toInsert){
listElements.addElement(toInsert);
}

public void erase() {
listElements.removeAllElements();
}

public int getPreferredWidth(ListField listField) {
// TODO Auto-generated method stub
return 0;
}


}
}


The final result will be a scrollable list that highlights the user selected option in a Light Yellow color, as shown in the screenshot at the top of this post. Once you understand how this works you can see how modifications to the overridden paint() method in ListField could permit you to have highly modifiable rows in the list - for example, in a Flikr client app you might have a scrollable list of your friends with a thumbnail on each row showing a sample picture from that friend's account. When the user scrolls to a new friend in the list (startLine == curSelected), you might initiate a function that updates the thumbnail with a changing feed of images from that user's account. The possibilities are almost infinite when customizing ListFields. I'll be on the lookout for questions in the comments section.
In order to maximize sales of your application you'll want to ensure that your code will run across all the Blackberry JDE component versions, or at minimum you'll want to write code that is portable across the most popular Blackberry phones on the market: the Pearl, Curve, Bold and Storm and the various iterations of models within each line.

The main issue outside of the complexity of managing memory and laying out the screen components is that you want to have a single manageable code base that runs across Blackberry phones so you don't have to contend with several branches of code specific for each phone. You might think that you'd simply import the appropriate Storm touch classes, code the touch interface aspects of your app, compile and run to make your existing code work for 4.7.0. The problem is that shortly after you're done you'll see that your code will run on the Storm simulator but fail miserably for anything below 4.7.0 - the 4.6.x components and below don't recognize imports of classes built for 4.7.0.

Preprocessor Directives and Definitions


So how do we take our existing code, add the touch aspects, and have it compile in 4.6.x and below? This is where preprocessor directives come into play. In standard C and Java programming, preprocessor directives are invoked by the compiler as the first part of translation. For example, #include and #define in C and import in Java. In the context of Blackberry programming, the preprocessor directives will tell the compiler to import class definitions and perform statements within our code dependent on preprocessor definitions that we set up within the Eclipse programming environment.

For our example, we will use the preprocessor directives to tell the compiler to load the TouchEvent and VirtualKeyboard classes from 4.7.x. In order to do this within the Eclipse environment we have to do a bit of a hack by using the #ifndef (otherwise known as 'if not defined') directive as if it is a #ifdef(otherwise known as 'if defined'). We'll also configure the Eclipse IDE to provide the preprocessor definition which will write the appropriate config to the .jdp RIM project file without us having to manually edit it.

Eclipse Configuration


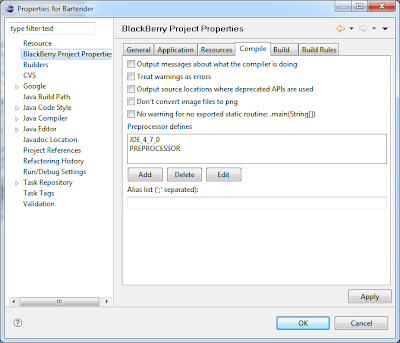
The current iteration of the Eclipse Blackberry plugin has the capability for preprocessor definitions built in, under the project properties. The settings can be found by clicking in the Eclipse menu on Project->Properties->Blackberry Project Properties and selecting the "Compile" tab. It will look like the image below:


If your Eclipse doesn't have the 'Preprocessor Defines' box then you'll have to update your plugin version to take advantage of this feature. Click the Edit button and add the following lines:

  • JDE_4_7_0

  • PREPROCESSOR


Click the Apply button and Eclipse will clean the project and rewrite the Preprocessor defines you just added to the .jdp RIM project file. Just as a sanity check, open this file and check the 'Options' line that is near the end. It should now look like this if the changes were appropriately made:

  • Options=-define=JDE_4_7_0;PREPROCESSOR


Adding Preprocessor Directives to Your Code


Now that you've configured Eclipse with the proper Preprocessor definitions you need to add the directives to your code so the preprocessor knows what to add and when. For our example we are going to add the code necessary to perform touch events and import the appropriate 4.7.x classes. First you want to import the classes to your program file, then surround the import statement with the directives,refer to the example below:


//#preprocess
import java.util.Enumeration;
import java.util.Hashtable;
import java.util.Vector;

//#ifndef JDE_4_7_0
/*
//#endif
import net.rim.device.api.ui.TouchEvent;
import net.rim.device.api.ui.VirtualKeyboard;

//#ifndef JDE_4_7_0
*/
//#endif

import net.rim.device.api.ui.Graphics;
import net.rim.device.api.ui.Keypad;
import net.rim.device.api.ui.MenuItem;
....


We're using #ifndef statements and multi-line comments to trick Eclipse into allowing the import statements without showing errors when you don't have the 4.7 components installed. As a result these statements will appear as comments in Eclipse but will load appropriately when the JDE_4_7_0 preprocessor definition is loaded. Note that you must have the #preprocess statement at the top of any file where you're using preprocessor directives.

Within your code blocks you'll also have to use this commenting approach around any statements dependent on the 4.7 components. Refer below to the VirtualKeyboard calls within the constructor call:


public SearchScreen(Search s){


super(DEFAULT_MENU);
//Necessary because by default keyUp events are disabled
UiApplication.getUiApplication().enableKeyUpEvents(true);
search = s;
myCallback = new ListCallback();
myCallback.erase();
myList = new ListField(0,Field.FIELD_HCENTER);
ingredients = search.getIngredientList();

//#ifndef JDE_4_7_0
/*
//#endif

vk = this.getVirtualKeyboard();
vk.setVisibility(VirtualKeyboard.HIDE_FORCE);

//#ifndef JDE_4_7_0
*/
//#endif
}


Now when you want to run the code using 4.6 or lower components just delete the JDE_4_7_0 preprocessor definition from the project properties and change the installed components to 4.6 or lower. You'll find that Eclipse won't generate any errors and the code will run as intended across devices.

Epilogue


Obviously there are other issues that plague Blackberry developers when it comes to cross phone portability. One issue is that of available phone memory which determines the number of persistent/normal object handles available to your program. For a great guide on managing memory, check out the Blackberry Memory Best Practice Guide.

Secondarily, you'll have to ensure that your application layout is portable across phones since the resolution is different between models. You'll find yourself having to check the resolution of the device within your code in order to position buttons, align text boxes, etc. for each device. In other words, there will be a lot of code that checks the screen width and height to layout the screen for each device similar to the code below that sets the font size for different devices:


width = Display.getWidth();
height = Display.getHeight();

if(width == 480 || width == 360)
fSize = 21;
else if(width == 320)
fSize = 18;
else
fSize = 16;

Configure Eclipse with Python and Django on OS X

I've recently been doing some development using the Python web application framework Django. To make my life easier, I configured Eclipse to work with Python and Django however I soon discovered the many disparate resources on the web are either dated or incomplete. Thus, the main goal of this post is to consolidate those resources into one comprehensive and easy to follow post that I'll try to keep as succinct as possible while maintaining clear instruction. Also, I'll assume that you already have Eclipse installed and if not, go get it - what are you waiting for? I'm using Eclipse 3.5.1 but I believe these instructions will work for 3.4.x as well with some slight modifications.

Also, these instructions assume the following:

  • For simplicity's sake we're going to use SQLite for Django database - Python 2.5 and above come with SQLite support so no install necessary.

  • No previous versions of Pydev modules or Django on your system.

  • We'll be using the built-in versions of Python inherent in Leopard (python version - 2.5.1) or Snow Leopard(python version - 2.6)


Installing Python Support - Pydev plugin


The Pydev plugin from aptana gives you syntax highlighting, code complete, etc for Python in the Eclipse environment and in my experience work exceptionally well.

Open Eclipse and perform the following:

1) Help->Install New Software. In the "Work With" form section, input the following site to download the Pydev modules: http://pydev.org/updates.

2) Select the Pydev plugin modules in the checkbox.


3) Click through, accepting the licensing agreements and wait for the module to install. Restart Eclipse. Open Eclipse->About and click on the Pydev Icon - we want to get the latest version of Pydev which is version 1.5.0.125.1989166 at the time of this post. If you have an earlier version use the automatic update feature of Eclipse to update just the Pydev module (Help->Update Software)

Install Django


4) Download Django 1.1.1, open a Terminal, navigate to the directory where you downloaded Django, and run the following commands:


tar -xvf Django-1.1.1.tar.gz
cd Django-1.1.1
sudo python setup.py install


Yep, it's as easy as that.

Configure PyDev to use Django


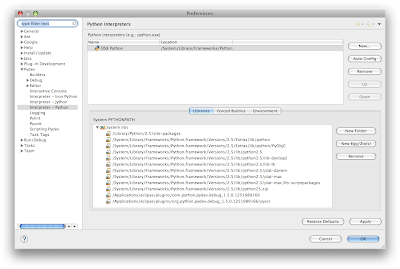
4) After installing Django, we need to ensure that the newly installed directories are visible to the Eclipse python interpreter. In the toolbar under Eclipse->Preferences->Pydev, click the Interpreter-Python option and the following window will appear:


5) Click 'New' and populate Interpreter Name with any value you want (I called it 'OS X Python'), and populate the Interpreter Executable with the path to your python executable - the default path on OS X is /usr/bin/python.


6) Eclipse will attempt to locate the libraries for Python and will display a pre-populated list of directories to add to the Eclipse PythonPath - i.e., the modules and binaries necessary for Python to run. Critical here is to select the directory where Django files were extracted when we installed it earlier. So make sure to select '/Library/Python/2.x/site-packages', as in the screenshot below. After you click 'OK' you'll be taken back to the preferences screen. Click 'OK' again and Eclipse will reparse the site packages.


Sanity Check


7) As a quick sanity check, create a new PyDev project and then a new Python file within that project space. Test a django import statement to see if code completion is working. It should look something like the screenshot below:


Create a New Django Project


8) Open Terminal navigate to a directory where you want to store your first Django project. Once there create a new directory for your project, navigate into the folder and enter the following command:

django-admin.py startproject PROJECTNAME
It's important to create the top level directory and place the new project files into a separate directory, as we'll see in a few minutes. If you navigate into the directory you created you'll see that Django has created the prepopulated files __init__.py, manage.py, settings.py, and urls.py within that directory. Now we have to import these into Eclipse.

9) In Eclipse, click 'File->New->Pydev Project' Name the project then uncheck 'Use Default' since we're using code that's already created for us in the previous step. Instead, click 'Browse' and navigate to the location of the top level directory you created previously. Uncheck 'Create default src folder' and click 'Finish'.


In my case, I created a top level directory named Djangoprojects and created the Django files with the django-admin.py command inside a directory named Django.

10) Within Eclipse, right-click the project you've created and click 'Properties->Pydev-PYTHONPATH->Add Source Folder' and select the project folder you created.


Now in the package explorer for your newly created project you'll see that your __init__.py, manage.py, settings.py, and urls.py are showing as a package.

Set up the Django Testserver


11) Now we have to configure Eclipse to start the the Django test server when we run our program. Right-click your new project in the Package explorer-> Properties->Debug Configurations(or Run/Debug Settings in newer versions of Eclipse). Click 'New' and select 'Python Run'. Press the new configuration button at the top, then give the new configuration a name (I call mine DjangoTest), under Project click 'Browse' and point to our new project, and under Main Module point to the manage.py of our new project. It should look as follows:


Under the Arguments tab, for Program Arguments, type in 'runserver'. Refer to the screen below:


Now right-click your project, then 'Debug As->Python Run' then browse to the manage.py file within your project to launch, and click 'Ok', if all went well you'll get info in the console indicating that the pydev debugger is running:


Point your browser to http://localhost:8000/ and you should see the following page:


Unfortunately, you'll likely find that you're unable to shut down the server from Eclipse using the square red button near the console. Also, it won't shut down when you close Eclipse so you'll have to get in the habit of shutting down the Python process using Activity Monitor.

Debugging with Django and Python


12) Nearing the end of the process now. We have to point Eclipse to the working directory within our workspace for it to be able to access the database (SQLite in our case). So we go back to the Python perspective and right click our project->Debug As-> Debug Configurations(or Run/Debug Settings in newer versions of Eclipse)-> Arguments Tab. Under 'Working Directory' we click 'Other' then 'Workspace' and browse to our inner folder (In my case the Django folder within Djangotest). Bear in mind that if your code resides in a directory outside the Eclipse workspace you'd have to use the 'File System' button and point to the appropriate directory in your filesystem. Refer below:


The final debug configuration should appear as the one below:


13) Lastly we need to configure Eclipse to have the python debug folder 'pysrc' in the PYTHONPATH variable. Select Eclipse in the menu toolbar -> Preferences ->Pydev->Interpreter-Python->New Folder. Browse to the plugins folder of your Eclipse install, in my case located on the path '/Applications/eclipse/plugins/org.python.pydev.debug_1.5.0.1251989166/pysrc. Click apply and Eclipse will again reconfigure the PYTHONPATH to include the debug extensions. Be careful here if you updated your pydev modules as described there will be a debug folder for the previous version and you want to make sure you're using the latest and greatest. The config should look like the screenshot below:


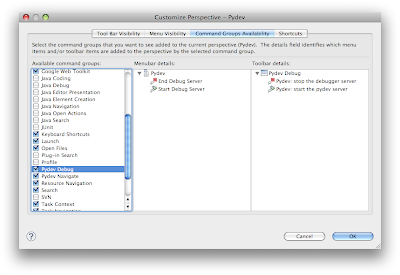
In order to simplify starting and stopping the debug server, right-click the toolbar Eclipse toolbar (within the Eclipse window) where there aren't buttons and select 'Customize Perspective'. Click the 'Command Groups Availability' and check the Pydev Debug switch. This will place the start and stop debug server options directly within the Eclipse toolbar. It should like like this:


Now, when adding breakpoints to your code you'll be able to debug in Eclipse as you're used to with Java. One note: in order to see the debugging perspective within Pydev you'll have to close the Pydev perspective and reopen it so it can reload the modules we've added - otherwise you'll never see the debug option. In order to test this place a breakpoint in your python code and run the debugger. The python debug perspective will subsequently open and you'll be able to step through your code, see running values of variables, etc.

14) Celebrate. You've completed installation of Python and Django support in Eclipse and this was no easy task. I'd suggest periodically looking for updates to the Pydev extensions as they are regularly improved by the good folks at aptana. The following is a list of several resources I used to compile this post in the event that you need additional help:

Blackberry Code Signing - Setting up Eclipse to use Keys

During the course of development on the Blackberry platform you're bound to call functions from RIM's set of restricted APIs. The APIs with controlled access tend to be the most interesting as they touch core OS modules such as messaging, invoking the browser, access to mail, adding menu items, etc. The point of controlling access via code signing keys is you'll be interfacing with system critical functionality - RIM needs to be able to map applications to specific developers in the event your code is wreaking havok with the OS or is performing something unethical. Although the keys cost $20 US per set you should count yourself lucky to be developing on a platform where you can run your application as a background process unlike Apple app development where you're running in a sandbox. This means that you'll be able to freely add to the functionality of the phone, permitting you to extend and improve RIM' built-in features.


Restricted Blackberry APIs


When you're testing on the simulator Eclipse will give warnings that you're calling these restricted APIs but will still permit you to invoke the simulator. Ideally, you'll want to install your application on an actual phone and this is where obtaining the code signing keys come into play. Below is an overview of the Blackberry packages that require code signatures:

  • net.rim.blackberry.api.browser - gain access to the Blackberry Browser application through getDefaultSession() and getSession() functions

  • net.rim.blackberry.api.invoke - provides functionality for your application to access and invoke internal applications such as Camera, Calendar, Calculator, Maps, etc.

  • net.rim.blackberry.api.mail - interface to mail features including sending, receiving, and accessing email.

  • net.rim.blackberry.api.mail.event - interface to listener functionality for events, mail, folder changes, services, etc.

  • net.rim.blackberry.api.menuitem - permits adding and registering custom menu items to application.

  • net.rim.blackberry.api.options - add system-wide option menus for multiple applications to access.

  • net.rim.blackberry.api.pdap - if your application must conform to the Personal Digital Assistant Profile(PDAP) speification you must implement this interface.

  • net.rim.blackberry.api.phone - as the name suggests, the PhoneListener interface along with the Phone and PhoneCall classes permits access to the Blackberry Phone application to send and receive calls along with changing phone options.

  • net.rim.blackberry.api.phone.phonelogs - interface for attaching listeners to phone log events.

  • net.rim.device.api.browser.field - interface to BrowserContent (URL rendering) and events to open, close, and monitor browser fields.

  • net.rim.device.api.browser.plugin - API to add support for custom MIME types to the RIM browser.

  • net.rim.device.api.crypto - API for encryption and decryption of data, digital signing, authentication of data.

  • net.rim.device.api.io.http - provides API for request methods, header requests, and push input streams for use with TCP/IP connections.

  • net.rim.device.api.notification - API for indicating events to the user via tone, vibration, or LED as well as dialogs or interaction screens on the RIM device.

  • net.rim.device.api.servicebook - provides access to the device service book containing information that configures how the phone will interact with the enterprise infrastructure and enables specific services for the device.

  • net.rim.device.api.synchronization - interface to backup/restore both wired and over the air.

  • net.rim.device.api.system - not all system classes/interfaces require code signing keys however those that do include: interface for receiving audio events, application management(ApplicationManager), access to the backlight(Backlight), requests for the Device to power down, go into storage mode, set time and date(Device), API to access the device display properties (Display), access to store application object data on the phone (PersistentStore), and more.


Apply For Signature Keys and Install


The first step in the process is to complete the web form application including providing your credit card details and a personal 10 digit PIN number that you create. Think of it in the same way as the PIN number for your ATM card - it protects you from someone else acquiring your key and using it to sign their application. Once you submit the form, within 2 weeks you'll receive three emails from Blackberry, each containing a different client key - RBB, RRT, and RCR.

The instructions that come with the keys are comprehensive and I didn't run into trouble but I've included the Eclipse version below for reference. It is a two-step process for making a signed application. First you have to register the keys with RIM using the following process:

BlackBerry JDE Plug-in for Eclipse Users:

1) Save all 3 .csi files in the same directory (each one will be sent in a separate email message).
2) Start Eclipse.
3) Click on the BlackBerry menu and choose Install Signature Keys.
4) Select one of the 3 .csi files saved in step 1 and click Open.
5) Click "Yes" to create a new key pair file.
6) Type a password for your private key of at least 8 characters, and type it again to confirm. This is your private key password, which protects your private key. Please remember this password as you will be prompted for it each time signing is attempted or a signature key is installed.
7) Move your mouse to generate date for a new private key.
8) In the Registration PIN" field, type the PIN number that you supplied on the signature key order form.
9) In the Private Key password field, type the password created in step 6.
10) Click Register .
11) Click Exit .
12) Repeat this process for the other csi files.

One undocumented aspect of this part of the setup is that you'll have to copy the files 'sigtool.db' and 'sigtool.csk' from your main Research in Motion folder to your Eclipse plugin folder. On my system (Windows 7 64-bit) the originals were located at C:\Program Files(x86)\Research In Motion\BlackBerry JDE 4.5.0\bin and the path to the Eclipse plugin was C:\Program Files(x86)\Eclipse\plugins\net.rim.eide.componentpack4.5.0_4.5.0.164.5.0\components\bin. So long as these files are in the correct place you'll have the code signing keys installed and all warnings on use of restricted APIs within Eclipse will be eliminated within the workspace.

One Set of Keys on Multiple Machines?


Once you install the keys on your box you cannot move them to another machine without going through RIM support and requesting new keys. As I understand it, this process invalidates your original keys. The bottom line is that you cannot use one set of keys across multiple machines so chose the box where you install the keys wisely.

Request for Code Signature from Blackberry Signing Authority


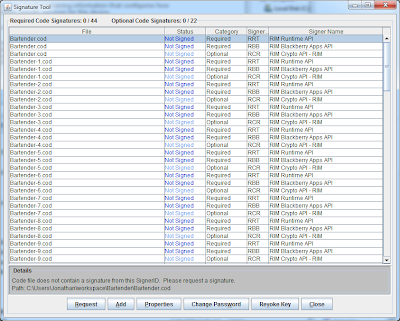
The second step is to force your .cod file to be signed by requesting the code signature from the Blackberry Signing Authority Tool. This is done by navigating to the directory where your compiled application resides and double-clicking the cod file you'd like to request signing. If the install of your keys went correctly the signature tool will appear that looks like the one below:


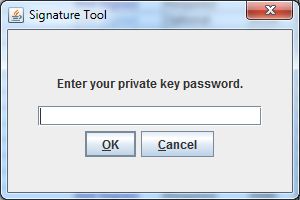
Since the application that I'm requesting signing for is large, you'll notice that the cod file is broken into many separate parts and each must be signed. When you click request, a popup will appear asking for your private key that you set up during the first step.


Enter your password and the request will be sent to RIM's signing authority. Keep your eye on the status column of the signature tool to see if you successfully requested the signing. If you were successful, the status will show "Signed" as below:


That's all there is to it. Now you can directly provision your application and test directly on the actual hardware. An extremely valuable reference to code signing can be found here.
top