 During the course of development on the Blackberry platform you're bound to call functions from RIM's set of restricted APIs. The APIs with controlled access tend to be the most interesting as they touch core OS modules such as messaging, invoking the browser, access to mail, adding menu items, etc. The point of controlling access via code signing keys is you'll be interfacing with system critical functionality - RIM needs to be able to map applications to specific developers in the event your code is wreaking havok with the OS or is performing something unethical. Although the keys cost $20 US per set you should count yourself lucky to be developing on a platform where you can run your application as a background process unlike Apple app development where you're running in a sandbox. This means that you'll be able to freely add to the functionality of the phone, permitting you to extend and improve RIM' built-in features.
Restricted Blackberry APIs
When you're testing on the simulator Eclipse will give warnings that you're calling these restricted APIs but will still permit you to invoke the simulator. Ideally, you'll want to install your application on an actual phone and this is where obtaining the code signing keys come into play. Below is an overview of the Blackberry packages that require code signatures:
- net.rim.blackberry.api.browser - gain access to the Blackberry Browser application through getDefaultSession() and getSession() functions
- net.rim.blackberry.api.invoke - provides functionality for your application to access and invoke internal applications such as Camera, Calendar, Calculator, Maps, etc.
- net.rim.blackberry.api.mail - interface to mail features including sending, receiving, and accessing email.
- net.rim.blackberry.api.mail.event - interface to listener functionality for events, mail, folder changes, services, etc.
- net.rim.blackberry.api.menuitem - permits adding and registering custom menu items to application.
- net.rim.blackberry.api.options - add system-wide option menus for multiple applications to access.
- net.rim.blackberry.api.pdap - if your application must conform to the Personal Digital Assistant Profile(PDAP) speification you must implement this interface.
- net.rim.blackberry.api.phone - as the name suggests, the PhoneListener interface along with the Phone and PhoneCall classes permits access to the Blackberry Phone application to send and receive calls along with changing phone options.
- net.rim.blackberry.api.phone.phonelogs - interface for attaching listeners to phone log events.
- net.rim.device.api.browser.field - interface to BrowserContent (URL rendering) and events to open, close, and monitor browser fields.
- net.rim.device.api.browser.plugin - API to add support for custom MIME types to the RIM browser.
- net.rim.device.api.crypto - API for encryption and decryption of data, digital signing, authentication of data.
- net.rim.device.api.io.http - provides API for request methods, header requests, and push input streams for use with TCP/IP connections.
- net.rim.device.api.notification - API for indicating events to the user via tone, vibration, or LED as well as dialogs or interaction screens on the RIM device.
- net.rim.device.api.servicebook - provides access to the device service book containing information that configures how the phone will interact with the enterprise infrastructure and enables specific services for the device.
- net.rim.device.api.synchronization - interface to backup/restore both wired and over the air.
- net.rim.device.api.system - not all system classes/interfaces require code signing keys however those that do include: interface for receiving audio events, application management(ApplicationManager), access to the backlight(Backlight), requests for the Device to power down, go into storage mode, set time and date(Device), API to access the device display properties (Display), access to store application object data on the phone (PersistentStore), and more.
Apply For Signature Keys and Install
The first step in the process is to complete the web form application including providing your credit card details and a personal 10 digit PIN number that you create. Think of it in the same way as the PIN number for your ATM card - it protects you from someone else acquiring your key and using it to sign their application. Once you submit the form, within 2 weeks you'll receive three emails from Blackberry, each containing a different client key - RBB, RRT, and RCR.
The instructions that come with the keys are comprehensive and I didn't run into trouble but I've included the Eclipse version below for reference. It is a two-step process for making a signed application. First you have to register the keys with RIM using the following process:
BlackBerry JDE Plug-in for Eclipse Users:
1) Save all 3 .csi files in the same directory (each one will be sent in a separate email message).
2) Start Eclipse.
3) Click on the BlackBerry menu and choose Install Signature Keys.
4) Select one of the 3 .csi files saved in step 1 and click Open.
5) Click "Yes" to create a new key pair file.
6) Type a password for your private key of at least 8 characters, and type it again to confirm. This is your private key password, which protects your private key. Please remember this password as you will be prompted for it each time signing is attempted or a signature key is installed.
7) Move your mouse to generate date for a new private key.
8) In the Registration PIN" field, type the PIN number that you supplied on the signature key order form.
9) In the Private Key password field, type the password created in step 6.
10) Click Register .
11) Click Exit .
12) Repeat this process for the other csi files.
One undocumented aspect of this part of the setup is that you'll have to copy the files 'sigtool.db' and 'sigtool.csk' from your main Research in Motion folder to your Eclipse plugin folder. On my system (Windows 7 64-bit) the originals were located at C:\Program Files(x86)\Research In Motion\BlackBerry JDE 4.5.0\bin and the path to the Eclipse plugin was C:\Program Files(x86)\Eclipse\plugins\net.rim.eide.componentpack4.5.0_4.5.0.164.5.0\components\bin. So long as these files are in the correct place you'll have the code signing keys installed and all warnings on use of restricted APIs within Eclipse will be eliminated within the workspace.
One Set of Keys on Multiple Machines?
Once you install the keys on your box you cannot move them to another machine without going through RIM support and requesting new keys. As I understand it, this process invalidates your original keys. The bottom line is that you cannot use one set of keys across multiple machines so chose the box where you install the keys wisely.
Request for Code Signature from Blackberry Signing Authority
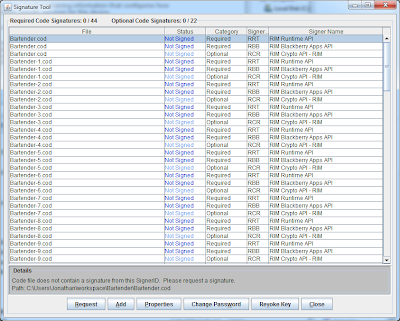
The second step is to force your .cod file to be signed by requesting the code signature from the Blackberry Signing Authority Tool. This is done by navigating to the directory where your compiled application resides and double-clicking the cod file you'd like to request signing. If the install of your keys went correctly the signature tool will appear that looks like the one below:

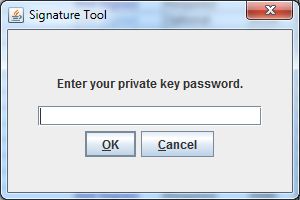
Since the application that I'm requesting signing for is large, you'll notice that the cod file is broken into many separate parts and each must be signed. When you click request, a popup will appear asking for your private key that you set up during the first step.

Enter your password and the request will be sent to RIM's signing authority. Keep your eye on the status column of the signature tool to see if you successfully requested the signing. If you were successful, the status will show "Signed" as below:

That's all there is to it. Now you can directly provision your application and test directly on the actual hardware. An extremely valuable reference to code signing can be found here.

7 comments:
Good stuff.I also found a great youtube video Java Development - Deploying and Signing Applications in the JDE Plug-in for Eclipse - BlackBerry http://www.youtube.com/watch?v=nyhU0HhzQaA.
Cheers!
Thanks a lot..your post helped me to understand a long, pending process..
thanks a lot..your post has helped me understand a long, pending process..:)
hi, thanks for the information, very usefull for me :)
Super Helpful
Thanks
i have done all process, but when i double click on COD file then not open the file in any signing tool, this open with file, so please tell me what am i missing with that.
You can manually open the signature tool from {Eclipse Home}\plugins\net.rim.ejde.componentpack{version}\components\bin\SignatureTool.jar
Although it should be opened up from eclipse > Blackberry > sign > Sign with signature tool, but it didn't work for me. Manual process works fine
Post a Comment